Build a fisheye lens
A fisheye lens is an ultra wide-angle lens who differentiates itself from others by getting a picture with a wide angle view.
The next image shows horizontal angles of lenses for lenses without distortion (or low distortion) for 35mm camera sensor (full frame); marked with * are angles for lens with distortion, such as fisheye lens.
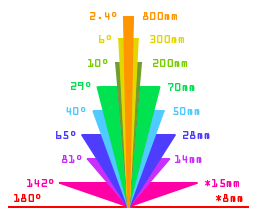
Horizontal angles of lenses
A fisheye produces a strong visual distortion, with a similar effect when we view through a door peephole. In fact, it's possible to attach the peephole in a compact camera, since the lens has a smaller diameter.
Reproduce the effect in a compact camera
It's very simple to attach a peephole in a compact camera.
I drill a hole in the center of a plastic bottle and put the peephole inside, we can now take pictures by putting it in front of the camera using the zoom for better positioning.
You can put some tape to fix everything in positioning.

Peephole attached to a compact camera


Shot test using a peephole was a fisheye lens
The project
The goal
The goal is to build a ultra wide-angle lens for a DSLR.
With some optical elements it is possible to build this type of a lens.

Example of a single divergent lens
The components
We need some components:
- Convergent lenses to guide the light into the camera sensor
- Divergent lenses to give us the wide-angle effect
- Diaphragm to control the amount of light that arrive to the sensor (it's realy necessary)
- Lenses to adjust the focus (for better photos), since the subjects are at different distance from the camera

Elements groups of a lens
In the picture above we can see (from left to right):
- A group of two divergent lens to get the wide effect
- A group with the focusing lens (also divergent)
- A group of two lens disposed symmetrically and the diaphragm in the middle
- The pink bar represents the camera sensor
The testing
I used several lenses and some of lens specifications were missing, I decided to start doing some tests with them to view some results.
Putting a source light in one top of the gutter, a plane target in the other end and the lenses in the middle, I could create a testing device. The idea was to get a focused image in the target board, after it's possible to start projecting the objective, taking the measures between lenses.

Testing lenses (click to enlarge)
In the first image the X marks the safe distance from the camera sensor, the distance / depth inside the camera.
Assembling the elements
In order to keep all lens in place I need to put them all in a tube and used available materials. In DIY projects we take what we have on hand.
- A tin of sausages as a lens tube - must have something to allow us to make focus
- Some hard and plan plastic (or PVC) for the diaphragm
- Rubber rings to support the lenses, I have not used glue to be able to make some final adjustments
- A ring to attach in camera, because of the price, I used a step-down ring and a reverse ring
- Glue
- Black tint

Assembling the elements and final result (click to enlarge)
The results
Two shots as test, one from a balcony and the other is a close up of a flower.
The smaller the hole in the diaphragma better, due to the bad quality of the glass.


Test shot (click to enlarge)


 Disclaimer